2026 Author: Erin Ralphs | ralphs@carsalmanac.com. Last modified: 2025-01-22 21:14:16
On Kalina cars, a three-phase generator generates alternating current. It’s not worth going into theory too much, it’s enough for an ordinary motorist to know only how to independently diagnose and repair the installation. This refers to the installation directly of the generator and voltage regulator. The fact is that at the output of the power windings, the voltage jumps in the range of 10-30 V, and 12 V is needed to power the entire on-board network. First of all, you need to straighten the voltage, and then stabilize it.
The principle of the generator

To visualize the operation of the installation, use the generator connection diagram. The second component of the installation is a voltage regulator, which is included in the power circuit of the rotor winding. There is a charging control lamp in the dashboard which:
- Lights up when the ignition is turned on and there is a breakdown in the generator set.
- Unlit in normal mode and when the battery is properly charged.
This lamp uses a relay with normally closed contacts to power it. Therefore, when the ignition is turned on, it lights up. Further, as soon as you start the engine, voltage begins to be generated by the generator. The relay winding is included in the rotor power circuit, when voltage appears, the contacts switch - they open and the lamp goes out.
The main components of the generator
In general, a generator is a converter that creates electrical energy from mechanical energy. On all vehicles, the design and principle of operation of these devices are similar. The design consists of the following components:
- Stator winding, thick copper wire is used for it, since it is with its help that voltage is generated.
- Rotor winding - excitation. Without it, the appearance of current in the stator winding is impossible. In order for some potential difference to appear in the frame, the presence of two components is necessary - rotation and a magnetic field. Thanks to the alternator belt on the Kalina, the rotor rotates. It is his winding that fulfills these two conditions - a magnetic field is created around it, and it rotates around its axis.
- Slip rings are installed on the rotor, to which voltage is applied using a brush assembly.
- A pulley mounted on the rotor allows you to transfer rotation from the crankshaft through the alternator belt on the Kalina.
- A mechanical or electronic type voltage regulator changes the voltage on the rotor winding. Due to this, the generator generates a stable voltage.
- The block of semiconductors (valves) mentioned earlier is needed to convert a three-phase AC voltage into a unipolar DC voltage.
- Bearing caps are designed for rotor alignment and normal plant operation.
- The capacitor allows you to get rid of the residual AC after rectification.
Signs of a broken generator

To diagnose the generator set, it is not necessary to remove it. Here are some typical symptoms of breakdowns:
- The presence of a hum and whistle from the generator indicates that the bearings are destroyed. If run, the rotor may jam and break the belt.
- Whistling, short-term ignition of the charging control lamp - the alternator belt on the Lada Kalina has worn out, or it has a weak tension. If the lamp is constantly on, then a break is possible.
- If the charging lamp is on, it means that there is no voltage at the output of the generator. The reason may lie in the windings, voltage regulator, slip rings, diodes, wiring.
Troubleshooting should start from the simplest to the more complex. It is possible that the reason for the failure of the generator is a break in one wire. But it is quite possible that there is a break in the rotor or stator winding. When repairing, the generator connection diagram should be at hand.
Actions when charging disappears

The generator on the "Kalina" with air conditioning has more power than on cars without a climate system. The design and faults are the same. What to do if the charge is lost? Don't panic and check right away:
- Voltage regulator. The easiest and most expensive way is to replace it with a known good one. But you can also apply a voltage of 12 V and 15 V to check the performance. Regardless of whether the regulator is mechanical or electrical, it will behave the same way. In the first case, the voltage supply to the excitation winding will be carried out, in the second - no.
- Contact rings and brushes of the generator. You can use a simple lamp probe to check the contacts. The length of the brushes should be more than 5 mm, otherwise they should be replaced.
- The integrity of the excitation winding can be checked with a tester. Moreover, it is not necessary to remove the generator, it is enough to crawl up to the slip rings and check the resistance between them. Please note that they must not short to ground.
- The state of the stator winding and the diode bridge can only be assessed after the generator has been dismantled.
How the generator is dismantled

Now we need to tell you how to remove the generator. To do this, act according to the following principle:
- Disconnect the battery.
- Disconnect all wires going to the generator.
- In advancethreaded connections are treated with penetrating lubricant such as WD-40.
- Unscrew the nut from the top mount of the generator. The bracket can also be removed.
- Unscrew the nut from the lower mounting bolt. Hold the head of the bolt from turning.
- Remove the Kalina generator belt from the roller. With air conditioning and power steering, no manipulations are necessary.
- Remove the generator from the seat.
Dismantling the device
To disassemble the generator, you need to carry out a few simple manipulations:
- Remove the drive pulley. Be careful not to lose the key.
- Unscrew the nuts from the back cover, which tightened all parts of the structure.
- Remove the voltage regulator. At the same time, evaluate the condition of the brush assembly.
- Disconnect all parts of the generator.
After that, you can proceed with the repair.

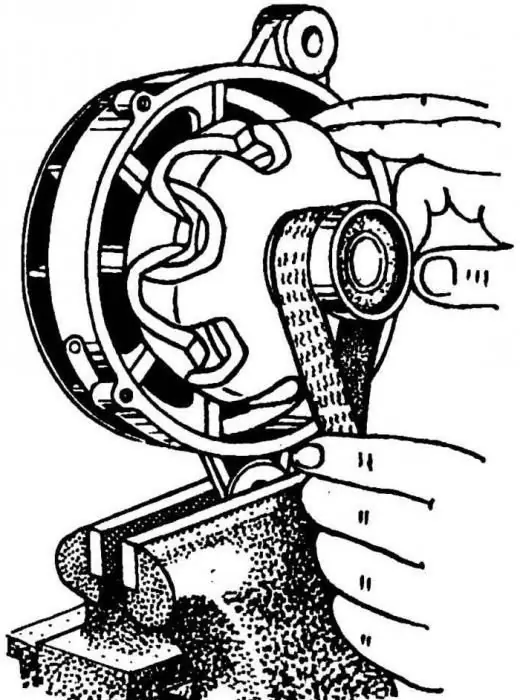
Bearings often fail, especially the one located in the front cover. The reason for this is excessive belt tension. To replace, you need to unscrew the four screws and press the bearing out of the seat. Replace it with a new bearing. To increase reliability, change both rollers at once.
Installation and repair features

Installation occurs in reverse order. If necessary, the generator is replaced or repaired. In some cases, repairs willimpractical, since there are many unusable nodes, including stator and rotor windings. Restoration will be expensive, it will be much easier to carry out a complete replacement of the generator at Kalina. The cost of a new generator in stores is 4-5 thousand rubles. On "showdowns" you can buy 2-3 times cheaper.
Recommended:
Air suspension device: description, principle of operation and diagram

There are many systems and mechanisms in the design of a car. One of these is the chassis. It can be dependent and independent, on longitudinal and transverse levers, with springs or springs. In today's article we will talk about the air suspension device, its principle of operation and other features
Oil cooler "Gazelle" - description, device, diagram and reviews

Everyone knows that the cooling system is a very important element in any car. Usually, it means a liquid engine cooling system. But I must say that in modern machines there are a number of other systems. What applies to them? This can be transmission fluid cooling (if the car is equipped with automatic transmission), or engine oil. We will talk about the last system today, using the example of a commercial GAZelle car
Additional automatic transmission cooling radiator: description, device, diagram and reviews

Automatic transmissions are no longer a rarity, and besides, they must be handled with care, since the oil that is present in the gearbox mechanism can overheat. And then it leads to very sad consequences. To avoid this, it is worth installing an additional automatic transmission cooling radiator and not knowing grief
Automotive generator stator: description, principle of operation and diagram

The generator is necessary for any modern car, as it is the main source of electricity when driving. In turn, the generator stator is its integral part, since it is in it that the current is generated
Gazelle generator and its malfunctions. Installation of the generator on the "Gazelle". How to replace the generator with a Gazelle?

The electrical equipment of this car is made according to a single-wire scheme: the negative terminals of the instruments and equipment are connected to the "mass" - the body and other mechanisms of the car, which play the role of a second drive. The on-board network of the Gazelle is equal to the nominal voltage of 12V DC. To turn on the electrical circuit, the ignition switch is used, which consists of a contact drive and an anti-theft lock

